September 16, 2020 • 6 minute read • ![]()
Testing and Deploying PySpark Jobs with Dagster


- Name
- Sandy Ryza
- Handle
- @s_ryz
Apache Spark has a beautiful API — so why is developing with it such a pain?
For many, it’s because different stages of the development cycle demand drastically different setups — some errors can be caught quickly with a local setup and small data, other errors require a cluster and bigger data, and finally production jobs need to run on production clusters against production data.
With Dagster's Spark EMR integration and Databricks integration, we can set up a harness for PySpark development that lets us easily switch between these different setups. We can define a data pipeline in one place, then run it inside a unit test:
def test_my_pipeline():
    execute_pipeline(my_pipeline, mode="local")
Launch it against an EMR (or Databricks) development cluster:
dagster pipeline execute -p my_pipeline --mode emr
And schedule it in production:
my_pipeline_schedule = ScheduleDefinition(
    name="my_pipeline_hourly",
    pipeline_name="my_pipeline",
    cron_schedule="0 * * * *",
    mode="emr_prod",
)
To learn how to do this immediately, scroll down to the Dagster & PySpark section. For a little more background, read on!
Discovering syntax errors on a 1000-node cluster
It’s painful to count the number of times that this sequence has happened to me when trying out a change to a PySpark job:
- Fire up my Spark cluster in the cloud and launch my job.
- Wait 10 minutes for it to complete.
- Click through multiple UIs to discover that I forgot to push my updated code to the cluster.
- Push my updated code to the cluster.
- Launch my job and wait another 10 minutes for it to complete.
- Click through multiple UIs to discover this error:
pyspark.sql.utils.AnalysisException: 'Resolved attribute(s) valid#99 missing from valid_date#142,
max_tmpf#166 in operator !Project [to_date(valid#99, None) AS valid_date#142, max_tmpf#166].;;\n
!Project [to_date(valid#99, None) AS valid_date#142, max_tmpf#166]\n+- Aggregate [to_date(valid#
99, None)], [to_date(valid#99, None) AS valid_date#142, max(tmpf#100) AS max_tmpf#166]\n +- Rela
tion[station#98,valid#99,tmpf#100,dwpf#101,relh#102,drct#103,sknt#104,p01i#105,alti#106,mslp#107
,vsby#108,gust#109,skyc1#110,skyc2#111,skyc3#112,skyc4#113,skyl1#114,skyl2#115,skyl3#116,
skyl4#117,wxcodes#118,metar#119] parquet\n'
This is basically Spark’s equivalent of a syntax error - I used the wrong column name. I didn’t need to run my job on any data to catch this, and I certainly didn’t need to run on a cluster in the cloud.
Environments
To generalize, Spark development is challenging because different stages of the development and deployment cycle demand drastically different setups:
- To quickly catch syntax and basic logic errors like the one above, we want a lightweight local setup with empty or tiny data.
- To catch data edge cases, we want a representative sample dataset.
- To catch distributed execution issues, we want to run on a cluster.
- To catch performance issues, we need a production-sized dataset, but we don’t want yet to overwrite production tables.
For each setup, we need to make sure:
- We’re pointing at the right places to read and write data.
- We’re passing the right Spark configuration.
- We’re executing in the right cluster.
- Our latest code is available (not easy when launching jobs remotely).
Dagster & PySpark
Note: the full version of the code in this section is available on Github.
Dagster is a data orchestrator — it addresses this complexity by organizing our Spark code and our deployment setups. It also comes with pre-built utilities for deploying Spark code to environments like EMR and Databricks.
In Dagster, we cleanly separate the business logic behind our Spark jobs from the different setups they need to run in. We define our business logic as a DAG of python functions, called solids, each accepting DataFrames as input and returning DataFrames as output. Here’s an example of a simple DAG with three solids, each of which transforms some data using Spark:
@solid(required_resource_keys={"pyspark", "pyspark_step_launcher"})
def make_people(context) -> DataFrame:
    schema = StructType([StructField("name", StringType()), StructField("age", IntegerType())])
    rows = [Row(name="Thom", age=51), Row(name="Jonny", age=48), Row(name="Nigel", age=49)]
    return context.resources.pyspark.spark_session.createDataFrame(rows, schema)


@solid(required_resource_keys={"pyspark_step_launcher"})
def filter_over_50(_, people: DataFrame) -> DataFrame:
    return people.filter(people["age"] > 50)


@solid(required_resource_keys={"pyspark_step_launcher"})
def count_people(_, people: DataFrame) -> int:
    return people.count()

@pipeline(mode_defs=[emr_mode, local_mode])
def my_pipeline():
    count_people(filter_over_50(make_people()))
For a deeper dive into solids and pipelines, check out Dagster’s tutorial. The basic pyspark example describes how to define solids that access a SparkSession.
In the pipeline definition, we’ve included a list of “mode definitions”. Each mode describes a setup that we can run our pipeline inside. In this case, we’ve defined two modes: one for running locally in-process and one for running against a development cluster. We’ve left it out here for the sake of space, but we could create a separate “emr_prod” mode using the same pattern if we wanted our production setup to use a different EMR cluster.
Here’s what the emr dev mode looks like:
emr_mode = ModeDefinition(
    name="emr",
    resource_defs={
        "pyspark_step_launcher": emr_pyspark_step_launcher.configured(
            {
                "cluster_id": {"env": "EMR_CLUSTER_ID"},
                "local_pipeline_package_path": str(Path(__file__).parent),
                "deploy_local_pipeline_package": True,
                "region_name": "us-west-1",
                "staging_bucket": "my_staging_bucket",
                "wait_for_logs": True,
            }
        ),
        "pyspark": pyspark_resource.configured({"spark_conf": {"spark.executor.memory": "2g"}}),
        "s3": s3_resource,
    },
    intermediate_storage_defs=[
        s3_intermediate_storage.configured(
            {"s3_bucket": "my_staging_bucket", "s3_prefix": "simple-pyspark"}
        )
    ],
))
There’s a lot going on here, so let’s break it down:
- Modes supply a “resource” object for each of the “required_resource keys” for solids in the pipeline.
- Some resources are accessed by the code inside solids. For example, the third line of the make_people solid expects a resource called “pyspark” that can provide a SparkSession object. The pyspark_resource that’s given the name “pyspark” in our mode provides a SparkSession object with the given Spark configuration options.
- Step launcher resources are a special kind of resource - when a resource that extends the StepLauncher class is supplied for any solid, the step launcher resource is used to launch the solid. In this case, we pass an emr_pyspark_step_launcher resource, which launches the solid as a step on an EMR cluster.
- Modes can also supply an “intermediate storage definition”, which determines where the intermediate values between steps in the pipeline will be stored. In this case, we supply an intermediate storage definition that stores them in S3.
Our local dev mode is simpler:
local_mode = ModeDefinition(
    name="local",
    resource_defs={
        "pyspark_step_launcher": no_step_launcher,
        "pyspark": pyspark_resource.configured({"spark_conf": {"spark.default.parallelism": 1}}),
    },
)
In this case:
- We supply a pyspark_resource with different Spark configuration.
- We supply no_step_launcher, which runs the step in-process instead of in EMR.
- We don’t supply any intermediate storage definition, so Dagster falls back to the default, which stores intermediates in memory.
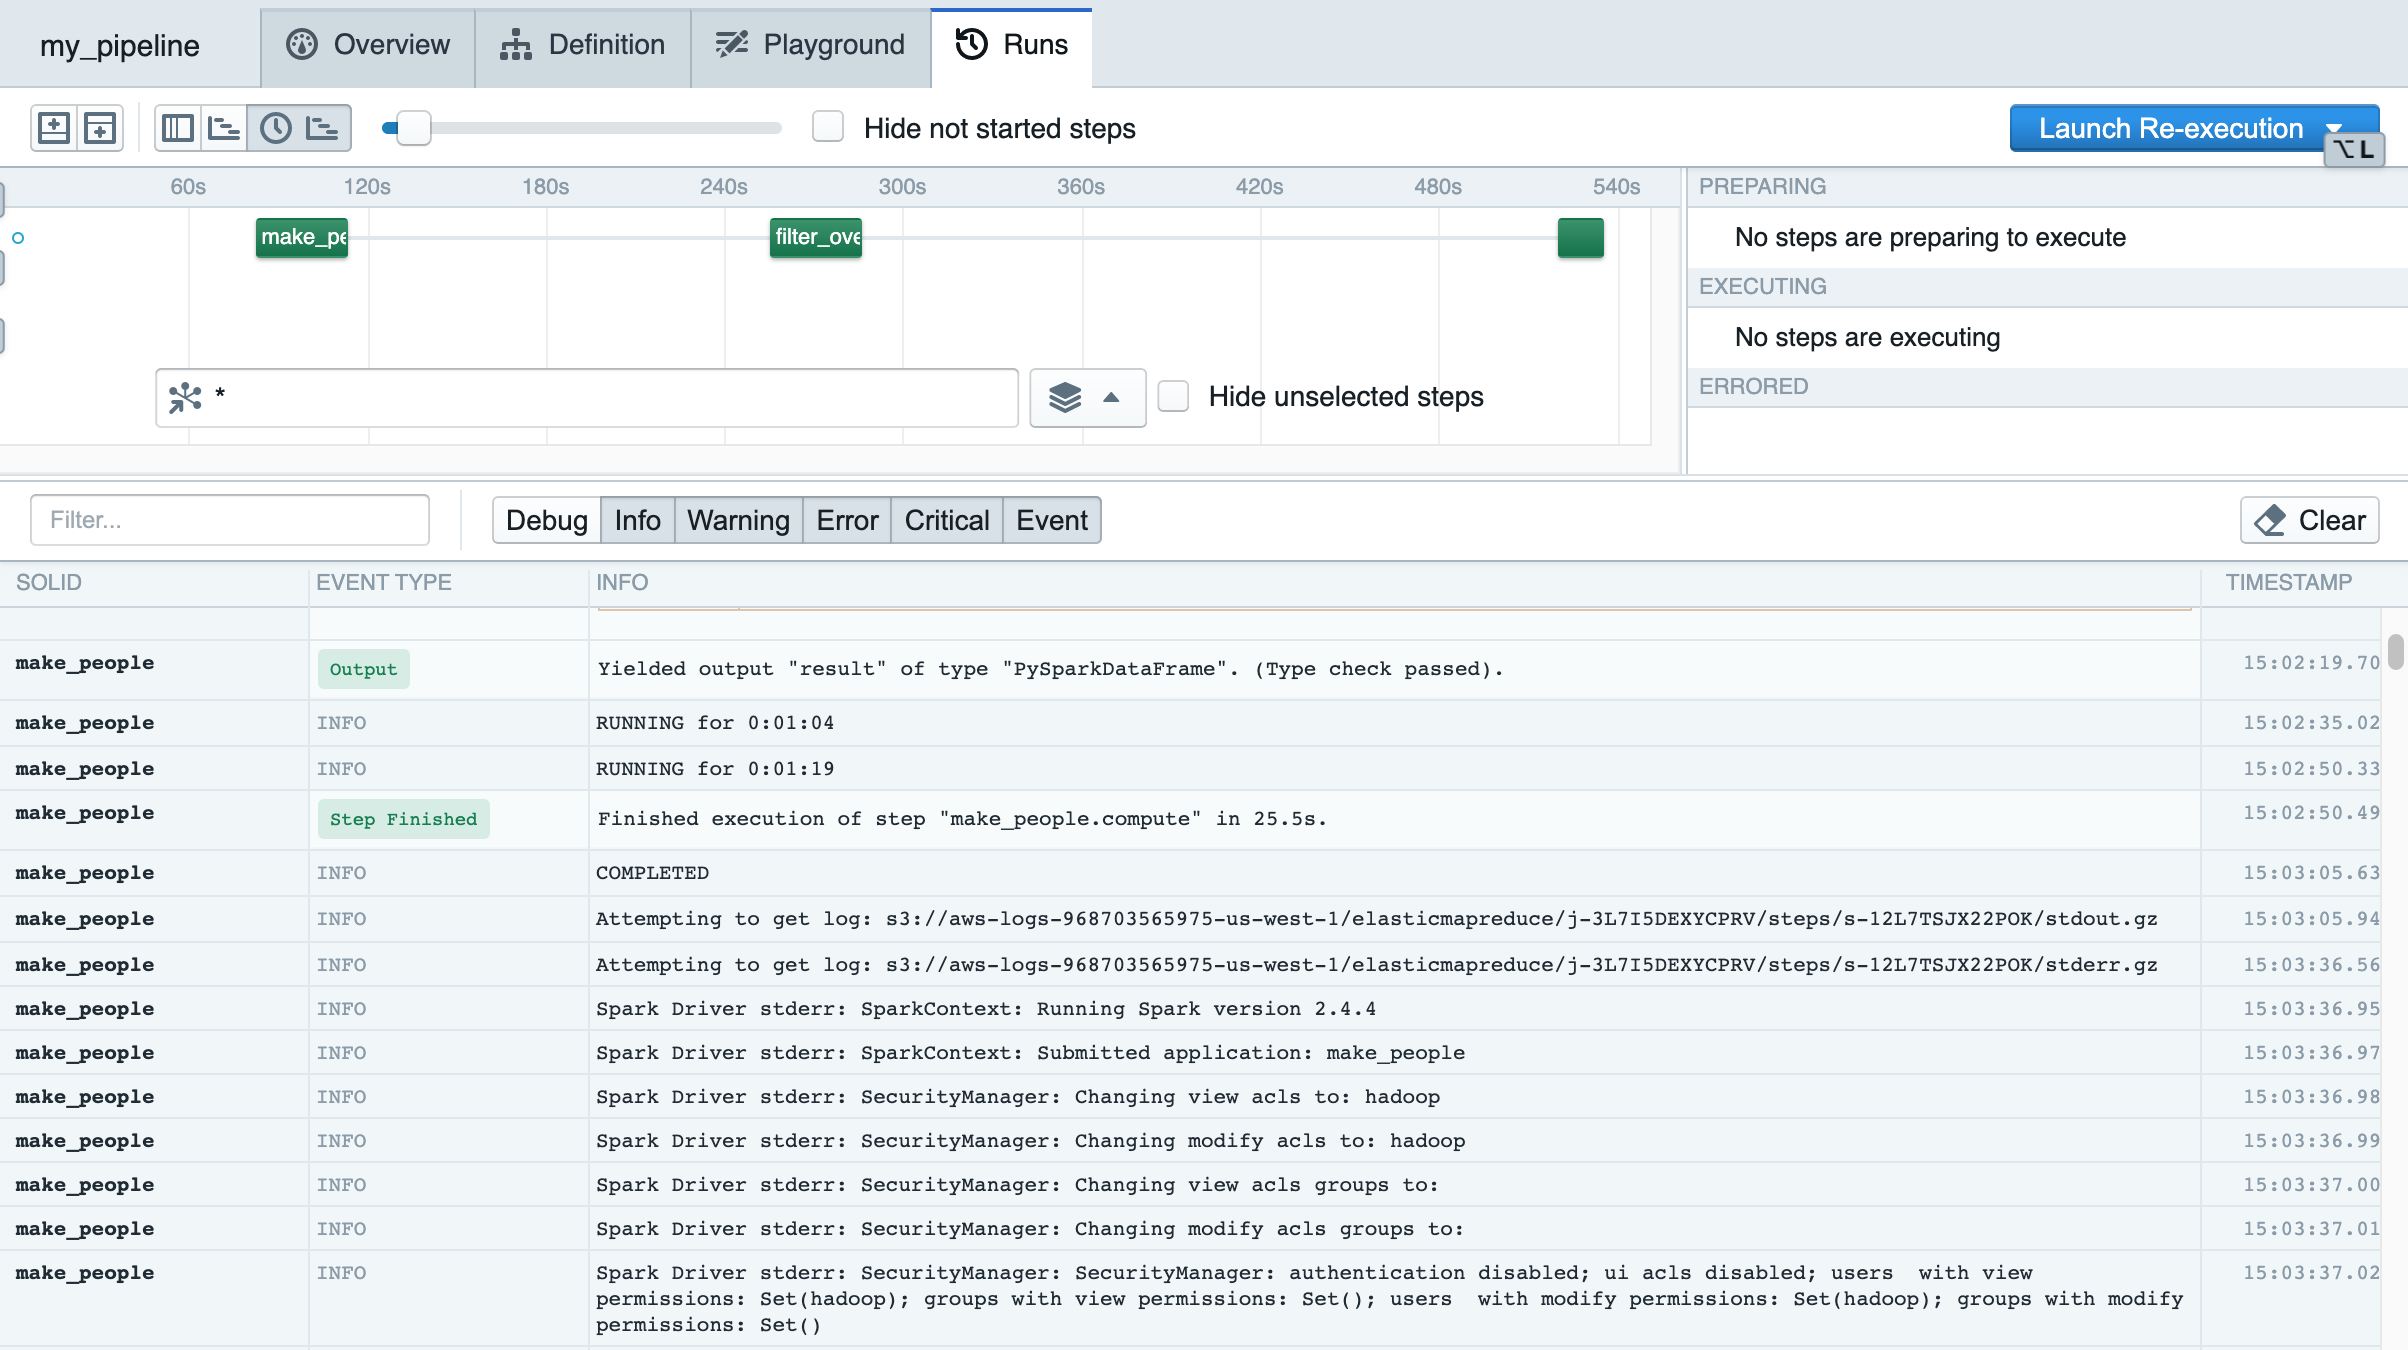
Dagit, Dagster’s web UI, lets us inspect the pipeline run. The structured log viewer makes it easy to search inside logs, and the Gantt chart makes it easy to understand which steps are delaying completion the longest.

Deploying code on each job run
Developing against a remote cluster has a way of making us appreciate the things we take for granted when developing on our laptop. The biggest one of these things is running our latest code: after we edit Python source files, the next job we run on our laptop automatically uses these changes.
With remote development, this is not so easy. When we want to try out our latest code, we need to get it onto the cluster where we want to run it.
There are two basic ways of running PySpark code on a cluster:
- At cluster startup time, we can tell the nodes to install a set of packages. EMR handles this with bootstrap actions, while Databricks handles this with libraries. This is a good choice for packages that we expect to be stable across a number of jobs. We recommend installing the dagster and dagster-pyspark packages this way - you’ll need them on your cluster to run Dagster PySpark jobs there. It’s not a great choice for deploying new code from our laptop for each job.
- We can submit code with spark-submit’s --py-files option. This is a good choice for deploying new code from our laptop, because we can post new code for each job run. It’s also a bit of a hassle - it requires packaging code up into a zip file, putting that zip file on a remote store like S3, and then pointing to that file on job submission.
Dagster’s emr_pyspark_step_launcher can be configured to help us with the latter option by automating the packaging and S3 upload for each job submit. We just set the deploy_local_pipeline_package option to True in our configuration for the step launcher. The local_pipeline_package_path option tells the step launcher what directory to package up.
Setting this option isn’t always recommended. For a regularly scheduled job, you might want to put your code on S3 ahead of time so that you don’t spend time packaging it up on every run. But it helps achieve a much tighter development loop.
That’s All
For a full set of config options for the emr_pyspark_step_launcher, check out the EMR integration documentation.


We're always happy to hear your feedback, so please reach out to us! If you have any questions, ask them in the Dagster community Slack (join here!) or start a Github discussion. If you run into any bugs, let us know with a Github issue. And if you're interested in working with us, check out our open roles!
Follow us:

Orchestrate Unstructured Data Pipelines with Dagster and dlt


- Name
- Zaeem Athar
- Handle
- @zaeem
Parallel Computing on Dagster with Dask

- Name
- Odette Harary
- Handle
- @odette

Orchestrating dbt™ with Dagster

- Name
- Rex Ledesma
- Handle
- @_rexledesma
- Name
- Sandy Ryza
- Handle
- @s_ryz